Knowing When to Contact a Plumbing Professional for Water Heater Repair

Water Heater Repair

Water heaters play a critical role in the comfort of your home. If you notice an issue, such as a lack of hot water or puddles around the unit, it’s time to call Water Heater Repair Denver.Water Heater Repair

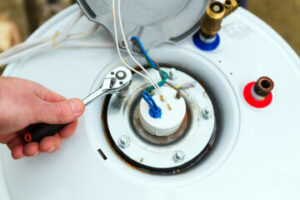
First, make sure the circuit breaker is on and hasn’t tripped. Then, check the upper and lower heating elements.

The upper and lower thermostats on a water heater are responsible for heating up your water. If either of them go out, your hot water may not be as hot as usual. There are several causes of this, including a lack of electrical power (blown fuses or circuit breaker), a broken heating element, or a thermostat that isn’t working properly. If you suspect that your thermostat is the problem, you can try to troubleshoot it yourself.

The first thing you should do is check that the breaker isn’t tripped, and that the high-temperature limit switch isn’t popped. These switches prevent your water from getting too hot and protect you from scalding accidents. If they keep tripping, it’s a sign that something is wrong with your water heater and should be looked at by a professional.

If the breaker is fine, you can test the lower thermostat with your multimeter. You’ll need to disconnect power from the unit, and you’ll also need to remove the access panel on both the top and bottom of the tank. Be careful, as these panels contain live wires that are exposed when the cover is removed. Once you’ve disconnected the power, use a voltmeter to measure the resistance of the runner wires connected to the thermostat. If the resistance is less than 1 ohm, the thermostat is defective.

If it isn’t, you can relight the pilot light. You should only attempt this if you have the owner’s manual and are familiar with the safety precautions. If you aren’t familiar with the safe operation of gas water heaters, have a professional take a look at it for you. They can also repair or replace the thermocouple and gas control valve, both of which could be causing your problems. It’s important to find out exactly what is causing the problem so that you can make a decision about how to proceed. If your water heater is over 10 years old, a replacement may be the best option. If it is under 7, it’s worth trying to get it repaired by a Carter plumber.

Sediment in the Tank

Sediment buildup is a common problem with water heaters that have tanks. The sediment comes from minerals and particulates in your well or municipal water supply. Over time, it builds up in the tank and affects how your water looks and tastes. Eventually, it can cause your hot water heater to make odd noises and shorten its lifespan.

If you notice that your water has a rusty look or smells bad, it’s an indication of excessive sediment in your tank. It also makes it difficult for the hot water to heat properly and can contribute to higher energy bills.

Fortunately, sediment is easy to diagnose and fix with a few simple steps. Start by turning off the power to your water heater. Then drain the water heater by opening the valve and placing a bucket under the plastic relief valve drain pipe. This will help keep water from escaping during the draining process. Next, turn on your cold water supply. The resulting churning action will loosen more sediment and flush it out of the tank.

After draining the tank, turn off your water heater’s breaker or gas burner and let it cool down. Then, you can start the process over by turning on the water again and draining it once more. Repeat this process as needed until the sediment is gone from your tank.

If you have a gas water heater, you may hear unusual sounds coming from the unit while it’s heating up. These sounds are caused by air pockets that are trapped under the sediment layer and burn when heated up. The sounds are similar to hissing or sizzling.

Lastly, a metallic taste or scent in your water is another sign of excessive sediment in the tank. The bacteria in the sediment can corrode elements in your water heater and cause it to fail prematurely. In addition, the oxidized metals can discolor your water and give it a bad taste or smell. The odor can be prevented by using a magnesium rod in your tank to attract the bacterial and metals, but this rod will dissolve over time and must be replaced periodically.

Moisture on or Around the Unit

When a hot water heater is operating properly, excess moisture is supposed to drip from the top of the unit into a drain pan or to a safety float switch that shuts off the system. If there’s a leak or other problem, however, the water may leak around the bottom of the tank or out a vent pipe and onto the floor of the home. This is a major problem and one that often requires a professional plumber.

Another clue that something is wrong with your water heater is that the hot water smells odd or is discolored. This could be a sign that the tank is rusty or that there are other problems with your hot water supply, such as a faulty dip tube or sacrificial anode rod.

If you see puddles or pools of water near the water heater, turn off the power and cold water supply at the service panel. If there’s still no hot water, it could be because the breaker is constantly tripping or that the temperature and pressure relief valve is malfunctioning.

This valve should be tested at least once per year and replaced every five years to prevent over-pressurization of the tank. To test the valve, place a bucket under the drain pipe to catch the water and remove the plastic cap from the pressure relief valve on the side of the tank. Open the valve and relieve the pressure by turning the handle clockwise. When the water is no longer leaking, replace the cap and screw the valve into place.

You may also need to check the insulation around the vent pipe and ensure that there isn’t any damage or that it’s properly sealed. Keep flammable or combustible items away from the heater as well, as it’s possible to create a fire hazard if something goes wrong with the unit.

Leaks are a sure sign that your water heater is reaching the end of its useful life and may soon need to be replaced. If you have a corroded tank or other issues that can’t be repaired, turn off the water and call your local plumbing company to discuss replacement options.

Leaks

A water heater leak isn’t just annoying, it’s dangerous. It’s a fire hazard and it could cause water damage to your home. It’s also a safety hazard for your family as the leaking water could create a scalding hazard. It’s important to have any water leakage dealt with as soon as you see it. This way, you can prevent serious and costly damage to your home and your possessions.

The first step to take when a water heater leaks is to shut off the power and the water supply to the unit. Next, it’s important to find the source of the leak. This may be as simple as tightening connections that have come loose due to normal wear and tear, or it could mean replacing the entire water heater tank. In some cases, it’s best to have a professional inspect the unit and determine what caused the leak before taking action.

If a puddle forms near your water heater, it is likely that the tank is leaking. If this is the case, you’ll need a plumber to replace it with a new one. If the puddle is in a different area, it could be a symptom of other problems, such as rust or sediment.

Another sign of a water heater leak is rusty water coming from the unit. This usually indicates that the anode rod has become corroded and needs to be replaced as soon as possible to prevent further damage.

Leaks from the top of the tank often indicate a broken temperature and pressure relief valve, or it could be due to a faulty drain valve or a damaged expansion tank. Lastly, a leak from the bottom of the tank can be caused by a cracked or rusty lining in the tank or loose pipe fittings that need to be tightened or replaced.

A final issue that may indicate it’s time to get a new water heater is if the unit is over ten years old and has begun to leak. While it’s not impossible to fix a leak from an older water heater, the costs of repairs and replacement can become quite high over time, so if you are considering investing in a new unit, now is a good time to do so.

Hiring a Concrete Stair Installer

concrete

Concrete stairs can add a welcome boost to your home’s curb appeal. Concrete Stair Installer can also be very durable. But they can be expensive to install. It is important to work with a professional to ensure that your new steps are strong enough for your family’s use. Removing and installing concrete steps is much easier than people expect. This demonstrates how to do it.concrete

Concrete steps are a popular choice for exterior entryways to a home because of their durability and modern look. The average cost of a set of new concrete steps ranges from $900 to $5,000, including installation and removal of existing stairs. The size of the staircase, type of materials used, and additional features can affect the price. Whether the steps are poured or precast also impacts pricing. Poured steps typically cost more than precast.

Local building codes often require that concrete steps be anchored to the home’s foundation. This is especially important for outdoor steps, which can be subjected to heavy loads and harsh weather. Anchoring the steps to the foundation can add an extra $300 to $1,000 to the total cost of construction.

Some areas have strict requirements for the location of concrete steps, so it is best to consult a professional before installing them. They can help you choose the best location and ensure that the steps are safe for people to use. They can also recommend a contractor that can do the job well.

If you are replacing existing concrete steps, a professional can take care of the excavation and frame building process for you, which saves you money. However, the labor costs to remove existing concrete can run up to $400 per staircase. Some municipalities have additional fees for removing and disposing of concrete.

A DIY project may cost less, but it can be a complicated and time-consuming task for most people. The best way to avoid expensive mistakes is to hire a professional. They can ensure the steps are built correctly and won’t cause damage to the soil around your foundation.

Replacing concrete stairs is relatively inexpensive, but you need to budget for the costs of paint and protective coatings. It is recommended to choose a high-quality acrylic latex paint that can resist fading and UV rays. The paint will need to be reapplied after a year, so it is wise to hire a professional for this task. A concrete step repair kit is an inexpensive option for repairing minor cracks and holes.

Concrete stairs are a durable, low-maintenance option for your home. They can withstand the rigors of daily use, and they are easy to clean with a garden hose or pressure washer. They are also strong enough to support handrails, making them a safe and secure choice for households with mobility-challenged members. Concrete steps are available in a variety of styles, and they can be customized to fit your style or budget.

A basic concrete staircase can be made using simple materials. These include a mix of 3 parts cement, 2 parts sand, and 4 parts gravel, and a form to hold the concrete in place. The form should be sturdy and waterproof to prevent water seepage. It should be built in a level, flat spot. It is also a good idea to use an evaporation retardant, which slows down the curing process of the concrete and keeps it workable longer.

The concrete is poured into the form and allowed to set, which takes several days. After it has set, the form is removed and the steps are finished to the desired specifications. This may include smoothing the surfaces, cutting the edges, and adding any decorative elements. The finished product is then transported to the construction site and installed.

Precast concrete stairs are a popular choice for commercial and industrial buildings. They are easy to install and come in a wide variety of sizes and shapes. They can be customized to suit the requirements of each project, and they are often used in conjunction with precast wall panels or beams. They are also a great option for residential applications, as they can be installed quickly and easily.

Compared to poured concrete, precast steps are much cheaper. They are mass-manufactured, which cuts down on labor costs. They are also available in a wider range of styles and colors, so you can find one that fits your home’s decor. However, they are more expensive than poured concrete stairs, as they require more material to make. They are also heavier, so they are more difficult to transport and install on-site.

Some types of work require a permit before starting. These include: Adding a new driveway, building a deck, installing concrete stairs and more. A permit costs $100 and usually includes a professional inspection. A permit is needed because local authorities and building codes must be adhered to during the construction process. In addition, some homeowners’ associations have their own rules that need to be followed.

It is important that all permit applications are filled out completely and correctly. If there are omissions or errors, it can delay the issuance of the permit. In some cases, it can even result in a denial of the permit. The permit application should provide the scope of the project, plans and home owner or contractor information.

The permit process can take 4 to 90 days. It depends on the size and complexity of the project and whether or not an additional review is required before a permit can be issued. Homeowners and contractors should call the number listed on their permit to schedule inspections for the foundation excavation (before pouring concrete), rough-in, and upon completion. Permits that have not been inspected are subject to a double fee. It is also important that the permit is posted in front of the work site to be easily visible from the street.

Concrete stairs are an important addition to a home and require proper installation. They also require regular maintenance and repair. To avoid injuries, hire a professional to do the job. The expert will ensure that the stairs are safe to use. In addition, the contractor will ensure that the steps are anchored to the home’s foundation. Some localities may require that the stairs be secured to the foundation wall or slab.

The first step to installing concrete steps is to excavate the area. Then, a subbase is laid. This base protects the concrete from shifting and deterioration. A rebar cage also strengthens the structure. Then, a concrete mix is added and mixed thoroughly.

Once the concrete has been poured, it needs to be set. It takes at least a day for the concrete to fully set. In the meantime, workers should wear protective gear to avoid injury. They should also take care not to snag the newly-formed concrete with a sharp tool or object. It is also essential to keep a fire extinguisher on site.

It is important to follow all government and industry regulations when working with concrete. In addition, employees should wear personal protective equipment (PPE) to reduce risks associated with concrete cutting and coring. This includes a hard hat, safety glasses, dust masks, ventilation systems, gloves, steel-toed boots, and other appropriate safety equipment. Lastly, workers should document any hazards they encounter at work.

People who work with concrete and other construction-related materials are at a higher risk of sprains and other musculoskeletal disorders than the general population. This is due to the heavy nature of these materials, which can cause back strain and other issues.

Moreover, construction workers are at high risk of lung problems because of the amount of silica dust they inhale. To mitigate these risks, it is recommended to use a respirator or mask with a high particle filtration efficiency when working with concrete. The Occupational Safety and Health Administration has guidelines that cover these concerns.

In addition to PPE, workers should be trained in the specifics of concrete work. They should be familiar with the building codes, permits, and design requirements for stair dimensions and safety features. They should also be aware of any local hazard issues and communicate with each other clearly through hand signals or radios.